

🎶To the sewing room where the fabrics feast
The notions all came from their humble abodes
To get a jolt from my electrodes🎶
🎶They did the mash, they did the monster mash
The monster mash, it was a graveyard smash
They did the mash, it caught on in a flash
They did the mash, they did the monster mash🎶

If there’s one thing my little Sweet Pea thinks cannot live without, it’s snacks. These reusable monster bags are the cutest things ever! And you can easily put them in the washing machine or even just wipe them out with a damp cloth in between uses.

Here are two different ways to make washable snack bags. As a quick note, most waterproof fabrics (such as PUL) are not food safe and most food safe fabrics are not 100% waterproof. Rip-stop nylon is the best option but it won’t prevent all potential leaks, so be careful with what you put in the bag and/or how you package the food. The grey with white polka dots is a thicker duck canvas and the candy corn is quilting cotton. Both have been left over in my stash for awhile.

METHOD ONE: exposed seams
 You will need:
-1 zipper, at least 6″
-1 6″ x 3.5″ in main (top/face of bag)
-1 6″ x 11″ in main (bottom of bag)
-1 6″ x 3.5″ in lining
-1 6″ x 11″ in lining
-optional: buttons for eyes
 OPTIONAL: Before starting on the bag, sew some button eyes in place about 1-1.5″ above the edge. It’s okay, and even encouraged, to not line them up properly. I also used two different colors. It gives the monster a bit of character.

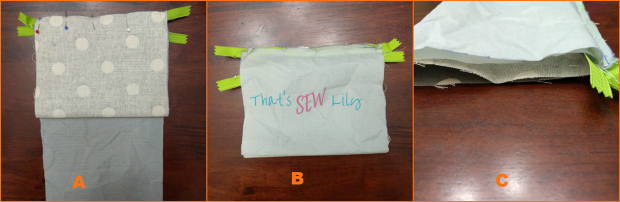
With both right sides of the top/face together, sandwich the zipper in between and line up the edges (A). Make sure the zipper pull is facing the main fabric. You can flip it up to check (B). Use a zipper foot to sew everything in place. Then fold everything back over and topstitch (C).

Repeat with the bottom of the bag. With both right sides together, sandwich the top of the zipper in between (A). Make sure the zipper pull is facing the main fabric (B). Use a zipper foot to sew everything in place. Then fold everything back over and topstitch (C). Also baste the top and bottom of the pieces together. (see the bright green lines I added to show where to stitch)

Fold the bag up, flip it over, and pin. Make sure the zipper pull is in the middle of the bag.

Use a 1/2″ seam allowance to sew all three sides closed (A). Then trim and serge or zigzag stitch the edges (B). Turn the bag right side out again, push the corners out, and press (C). Voila! It’s a monster!
METHOD TWO: fully enclosed liner

You will need: at least 7″ zipper, 6″ x 10.5″ in main, 6″ x 10.5″ in lining (it helps if it’s actually 1/8″ shorter), and OPTIONAL 2 buttons.
This bag starts off like the first one. I forgot to take pictures of this bag, but sew some button eyes in place ~1.5″ above one edge of the main fabric. It’s okay, and even encouraged, to not line them up properly. It gives the monster a bit of character.

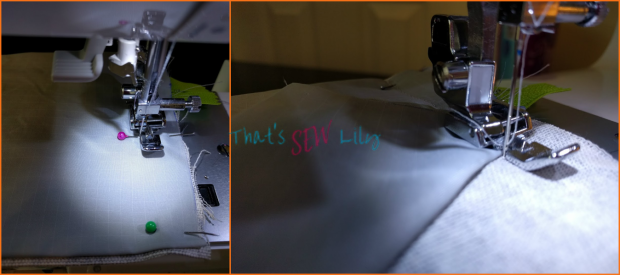
With right sides together, sandwich the top of the zipper in between. Make sure the zipper pull is facing the main fabric. Use a zipper foot to sew everything in place.
This is where it starts to divert from the other bag. With everything facing up, flip the main fabric up and line it up with the other side of the zipper (A). Turn it over and flip the liner up (B). There should be two separate loops (C). Use a zipper foot to sew everything in place.

Turn the bag right side out, decide where you want the top and bottom folds to be, and press. Then turn the bag inside out so each fabric creates its own loop again. The liner will be folded in the original direction but the main fabric will be in the opposite direction See how the liner stays flat because of the ironing but the main fabric is poofing up? Press again.

Pin the side together while the zipper is still fully closed (A). Make sure to pin somewhat close to each side of the zipper. Then carefully pull the zipper down into the middle of the bag (B). Pin the other side together and use a special pin to mark ~2″ from the bottom (C).
Sew the left side all the way down with a 1/2″ seam allowance, making sure to backstich at the top and bottom. Then sew the right side down to the 2″ pin, backstitch, and cut the thread. Fold the liner out of the way, line the needle back up exactly where you had previously left off, and continue sewing the main fabric.

Make an incinsion the liner fabric where the seam ends (A). Fold the liner out of the way and trim the seam allowance down to 1/4″ (B). Also trim the other side down to 1/4″ (C).

Pull the bag through the ~2″ opening and then fold the lining inside (A). Sew as close to the edge as possible (B). Turn the bag right side out again, push the corners out, and press (C). Voila! It’s a monster!
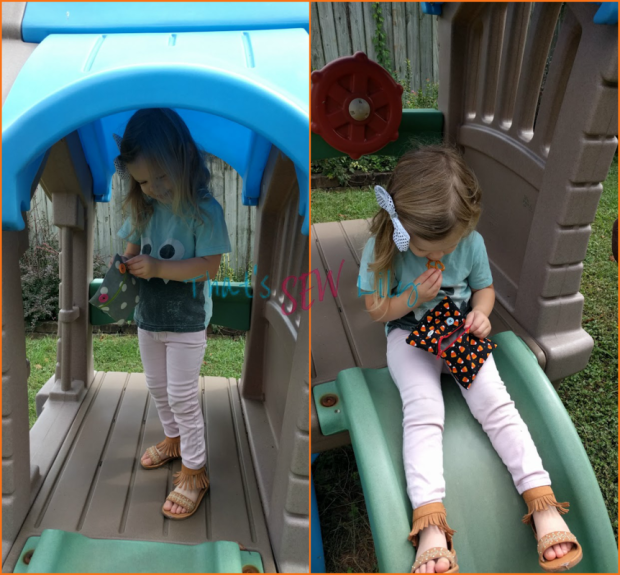
I think she approves! (at least of the snacks inside…)
My other Halloween related posts: Katerina Kittycat Costume
Happy Sewing!!
Ready to join us? Don’t miss a single stop on the October Monster Mash Tour!
October 1st: Sewing By Ti Intro
2nd: Sewing Blue
3rd: That’s Sew Lily ***you are here***
4th: Hazelnut Handmade
5th: Seams Sew Lo
6th: Sewing By Ti
Monday, October 9th: That’s Sew Amy
10th: Stitched By Jennie
11th: Hazelnut Handmade
12th: Seams Sew Lo
Friday the 13th!: Crafty Like a Rox
Sunday, October 15th: Mermaids Den
16th: Very Blissful
17th: Robynne and the Bobbin
18th: Sewing By Ti
19th: Octaves of Color
20th: Tenille’s Thread
Tuesday, October 24th: Adventures with Bubba and Bug
25th: My Heart Will Sew On
26th: Ma Moose Handmade
27th: EYMM
28th: Mermaid Mama Designs
29th: The Fairy Dust Bin
Monday, October 30th: Doctora Botones
Happy Halloween, October 31st: Sew Like a Sloth

Love your monster bags, what a great idea!
LikeLike
Thanks!
LikeLike
The monster bags are adorable! I bet my son would love these.
LikeLike
He probably would! My daughter wants to use them every day, even when we’re just at home. 🙂
LikeLiked by 1 person
Ooo! These are cute! I should make something like these because my kids take snacks to school every day!
LikeLike